How we’re working to complete the recycling circle - (and why your old waste could be just what we want!)
We love talking rubbish - that is, discussing waste and recycling, rather than reality TV. At The Bourne Group, one of our aims is to make everything as biodiverse and environmentally friendly as we possibly can. And, one of the ways we’re able to do this is through our Dumpy Bag Company
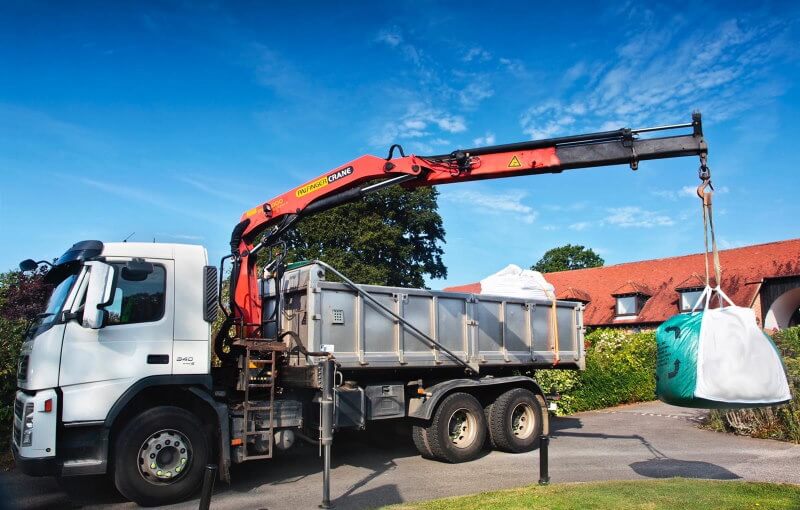
If you’ve ordered some of our Gardenscape garden products, for example some bark or some stone chippings, once you’ve put them into their desired spots in the garden, you might be wondering what to do with the empty bag - and that’s where our waste collection service comes in. You can just fill the bag back up with garden waste, household waste or construction waste, and we’ll come and collect it, and take it back to our environmentally permitted waste transfer station.
Our lorries are out delivering products every day, so we schedule the collections into their routes - that means there’s no wasted fuel, no additional pollution, and we can still be efficient, whilst also being eco-aware.
Your bag might have been used to deliver garden products to you, but that doesn’t mean you need to refill it with the same - whether you’re looking to get rid of old furniture, timber materials, roof tiles or even rubble from a housing project, just pop it in the bag, and we’ll take it away. (Of course, there’s some things we can’t take, like food waste and toxic substances. You can find a full list here).
We’re licensed by the Environment Agency to both transport and transfer waste, and once we get your bags back to our site, we sort through the waste, aiming to recycle at least 90% of everything we receive.
We aren’t picky though - we’ll even collect bags that aren’t our own and sort out the waste for you. And, if you don’t have a bag but would really like us to come and collect some waste, we can deliver a bag to you for you to fill.
We’re really passionate about this scheme because we want to make waste disposal responsible, and we’re committed to completing the recycling circle. For years, we’ve been in the business of delivering materials (many of which are recycled), and now we want to maximise the use of our lorries, so that they’re returning to us just as full as they left us - only they’ll be filled with waste products we can recycle and thus continue the cycle.
You’re probably wondering what the catch is (other than not being able to dispose of those toxic substances you were really hoping to be rid of). Well, collection costs £79.99 for one of our standard bags, but you can fill the bag with up to a tonne of waste - which is quite a lot of grass cuttings or broken bricks. We’re also able to offer discounts for multiple bag collections and for trade customers, so the more you recycle, the more you save.
We cover a wide area of postcodes across Kent and Sussex, so you can check here if you’re in our collection area. If you’re not, we might still be able to help - we charge £30 for collections outside of our designated areas, and we’re able to cover Surrey, London and even areas further afield.
So, if you’ve been staring at that empty Gardenscape bag wondering how you can possibly use it again, now you know. Just start filling it up, and give us a call when you’re ready for it to be collected. We’re really looking forward to talking rubbish with you!
To find out more about The Dumpy Bag Company, visit our website https://thedumpybagcompany.co.uk/ where you’ll find all of our FAQs, prices and contact details.

Brits love to discuss the weather, but these last few weeks it’s been justified - instead of a glorious spring beginning, we’ve been welcomed to the season with a somewhat cool reception. If May invited us over for dinner, we’d politely decline. The less than ideal conditions have put paid to barbecues, beach trips and, of course, many gardening plans.
There is a silver lining to all those clouds (and rain, and storms) we had in May however - the lower than average temperatures and soggy conditions may have spared gardeners a little longer to tick off those May to-do lists. While things definitely grew, as anyone who’s tried to mow their lawn recently can attest, some flowers that would usually be blooming by now are but mere buds, and the late frosts may have wreaked a little havoc.
So, now that Mother Nature’s spared you a little more time and sent some sun our way, let’s hope for a more jubilant June. Here’s some ideas for what to do in the garden this month:
Rose tinted gardens
There’s a few things you can do to your roses this month to really help them to thrive. For rambling or climbing roses, you can encourage more flowers by tying new stems to horizontal supports. By training them, you’ll encourage them to flower for longer so you’ll have beautiful blooms all summer long.
If your roses repeatedly flower throughout the season, then this month do some dead-heading to encourage new flowers. Don’t go too heavy on the pruning - you just want to cut them back no more than 5mm above an existing bud.
Keep an eye on your roses’ health too, and spray any that are showing signs of disease or mildew.
Hedge your bets
In the summer, hedges can get out of control if you’re not careful - it’s best to trim them every six weeks to keep them in check (and avoid any complaints from the neighbours!) Before you get too hack-happy, make sure you check in your hedges for any nesting birds so you don’t end up disturbing them and getting a shock!
Quench your thirst
No, not for a G&T (although one probably wouldn’t go amiss). We’re talking about water, and lots of it. Last month we spoke about ensuring thirsty crops and greenhouse plants were showered with a little extra water, but this month you’ll want to keep topping up the whole garden. Try to get into the habit of watering daily, or at least frequently, and definitely on warmer days. Pay special attention to any new trees or shrubs you’ve planted, because these will need extra quenching.
The nitty gritty
Grit in your soil helps to improve the drainage, so at this time of year it’s certainly worth investing in some to help with all that water you’ve been lovingly showering your plants with. You can also use a grit mix to top dress your pots to help reduce evaporation.
Want to know more about grit mixes and how they can help you make the best of your soil? Check out our helpful guide.
Do the June prune
Once your spring-flowering bulbs have flowered, it’s time to prune them. Look for young shoots lower down the plant, and prune back to them. Try to prune fairly soon after the bulbs have finished flowering, to allow maximum regrowth time, and as well as cutting stems back, also get rid of any weak shoots - when it comes to thriving flowers, it’s survival of the fittest! Once you’ve pruned, add some mulch, and some feed, and watch those flowers continue to thrive!
Turf’s up
Turf’s best laid when the ground isn’t too wet, so the chances are, if you were planning to carpet your garden in April or May, you might well have held off. Now that the ground is hopefully a little drier, you’ll want to lay your turf soon - but be prepared to keep on top of watering to keep it healthy and hydrated. There’s a fine balance when it comes to keeping your turf happy - you don’t want to over-water, so try to water it every few days, especially for the first month while it’s becoming established.

Why adding a grit mix to your soil could make all the difference when it comes to creating a thriving garden
Here in the Garden of England, we’re lucky to have some of the best weather in the country (apparently), alongside verdant landscapes and beautiful scenery. It’s an area known for its agricultural and garden prowess, but despite the climate and area, even the most proficient gardeners can struggle to grow certain plants and vegetables in their gardens.
Much of the struggle comes down to the soil you’re blessed with. For some, that can be free-draining soil, such as sand, but, in many areas of Kent, gardeners will find they’re working with clay soil.
Clay is a heavy, wet soil which holds nutrients well, but unfortunately doesn’t drain well - which is why some plants struggle to grow when just relying on the soil. This is where adding a mix to your existing soil could work wonders for your garden and plant growth. Here at Gardenscape we have a vast number of different mixes to choose from, including bed & border planting mixes all the way through to professional growing media, but we’re here to get into the nitty gritty today - discussing why a grit mix could be beneficial for you and your garden.
Why do I need to use grit in my garden?
Most gardeners will have clay dominated soil, which isn’t ideal for drainage, and on its own can make it difficult to grow things in the garden. In order to get around this, - you can create a raised bed, or you can plant into your own soil from your garden, dig it hard and then add amendments to improve its fertility - but this takes a long time, because you’re trying to change the balance from predominantly clay soil to predominantly sand. This is where grit comes in - being a bigger particle than clay, silt or sand, when it’s mixed with organic matter, grit will help the drainage of your soil, and provide the perfect environment for your crops to grow.
What’s the benefit of buying a mix containing grit?
It is possible to just add grit to compost in your pots and borders, but getting the perfect ratio of grit to growing media can be a tricky business, especially if you’re applying directly to beds and borders. Rather than attempting to mix yourself, by getting a ready-mixed product, you’ve got more time to get planting, and then enjoy a cup of tea and admire your handiwork.
What’s the best mix for me? We have all kinds of different mixes with added grit, but what works best for you depends on a number of factors - most importantly, what you’re looking to grow. Anything that doesn’t like a lot of moisture and requires well-drained roots (for example, cacti, alpine plants and lavender), could benefit from a mix with grit. We sell a huge variety of different mixes, but we also offer bespoke mixes if none of our range suits your needs. These are particularly popular with nurseries and professional gardeners. Just contact us to discuss your needs and how we can help create the perfect mix for you and your garden!
How should I use my mix?
That all depends on your planting plans - if you’re creating a new bed, then dig out the desired space, and add your mix before planting up. If you’re adding it to an existing bed, then mix it evenly and watch your plants thrive!
If you’re not sure which mix is best for you, or would like us to create a bespoke mix for you, get in touch with us.

It feels like it’s taken a long time to get here, but spring has finally sprung, and for many, this month is their favourite when it comes to appreciating the great outdoors - the garden looks greener, the trees have leaves again and two Bank Holidays on the horizon call for finally making use of the garden furniture and the barbecue.
But, before you recline in the hammock with a Pimms in hand, there’s lots to be done this month to get your garden ready for the summer. With everything beginning to grow and the warmer weather encouraging those shoots and buds to thrive, there’s also a double edged sword (or, perhaps a double edged trowel). The increased growth of the flowers and plants also means the grass needs cutting more frequently and those pesky weeds need keeping at bay. Still, after a hard day’s work tending to the garden, you’ll definitely have earned that Pimms…
Here’s some tips on which tasks to tackle outdoors this month:
Lawn and order
It’s good practice to work on your lawn now to help encourage healthy growth. May sees longer daylight hours and warmer soil than in previous months, providing the perfect conditions for the grass to grow. Apply a nitrogen-rich summer feed after mowing - the high levels of nitrogen will help to promote spring growth.
Stay hydrated
We don’t just mean you quenching your thirst in the garden, this month you’ll need to pay extra attention to your plants and ensure they’re getting plenty of moisture. Get into the habit of watering regularly, and don’t forget to give some extra love to thirsty crops such as courgettes, cucumbers and tomatoes, especially if you’re currently growing these in a greenhouse where it’s much warmer. Ensure soil is kept moist but don’t overdo it - you don’t want it to become waterlogged.
Hanging on
This month is the prime time to plant up hanging baskets, so that they’ll be abundant with flowers come summertime. Choose a mix of trailing and upright plants, and don’t forget to cut holes in your basket liner to allow the trailing plants to grow through. Once you’ve prepared the liner, fill with a multi-purpose compost which will provide the flowers with the additional nutrients they’ll need. Plant your largest flowers in the centre, add the trailing plants around the sides, and then fill any gaps with flowering plants such as verbena and petunias. Add more compost, and then hang in a sunny, sheltered spot. If the weather is still a little fickle, keep your basket in a greenhouse or shed for a few weeks until the temperature improves.
Slugging it out with the snails
You don’t want to plant all of your wonderful specimens, only to see them devoured by slugs and snails, so consider taking some steps to minimise the damage these critters can cause.
For pots, putting copper tape around the pot will stop them crossing the tape. Crushed eggshells will provide a similar barrier on your soil (but you’ll need lots of them), or try cockleshells as an alternative. Or, depending how you feel about picking them up, when you see them, relocate them to somewhere far away from their chomping ground (and no, not your neighbours’ garden.)
Mulch ado
Much like a spa treatment for your garden, mulch can work wonders on your soil. Not only does it work to lock in your soil’s moisture, it also improves its texture and even helps to keep weeds at bay. By layering a good quality mulch over your soil, weeds will struggle to grow due to a lack of light and won’t easily be able to find their way to the soil below. Apply around 2-3 inches of mulch on top of your soil for best results.
It’s a bug’s life
At this time of year, aphids (also known as greenfly or blackfly) tend to swarm to young growth in gardens, and in large numbers can be problematic for your plants because they suck sap from plants, weakening them and can even kill them off in some instances. Some species also transfer viruses to plants - and no amount of hand washing or mask-wearing can fix this unfortunately, so these plants will need to be destroyed.
However, it’s not all bad news - a small number of aphids is unlikely to cause any issues, because birds and insects such as ladybirds will eat them from the plants. It’s only in large numbers you’ll need to be wary, so if you do spot an influx of aphids, grab the hose and wash them off - they’ll fall to the ground where other creatures can eat them. Organic pesticides can also be used to treat them, just be careful not to spritz at a time when insects such as bees are visiting the flowers.
Bedding time
Once the last frost has occurred (it’s usually best to hold off until the end of May to be sure), it’s time to fill your borders with some colour, by planting out summer bedding and half-hardy annuals including sunflowers, cosmos and nasturtiums. Bedding plants grow quickly and will produce a lot of flowers quickly, so ensure you have a good compost to really help them thrive and bring lots of lovely colours to your garden.

As the weather finally begins to take a turn for the better this month, it’s just the encouragement we need to get out into the garden and crack on with that long list of jobs we’ve been putting off.
While there are undoubtedly many tasks you can undertake in April, from weeding to tree planting, the warmer air and moist soil also makes it the perfect time to dig deep and create a new border.
Borders can really transform a garden, and add some colour and interest to areas that may previously have looked a little unloved. With some careful planning, you could create a border that will continue to flourish with the passing seasons, or even use the border to disguise areas you’d prefer to keep hidden, like walls and sheds.
The great thing about borders is there’s no one size fits all approach; meaning whether you’ve got a cosy cottage garden or a sprawling lawn, you’ll be able to create something that works for you and your outside space.
Ready to cross into a new border? Here’s how to give your garden the edge it deserves...
Get plotting
Before you go digging and planting up your new border, you’ll need to do some important groundwork. Planning is essential - in order to decide which plants you’d like to grow, you’ll need to determine how much light and shade the area you’re hoping to place the border will get. Once you know this, you’ll have a better idea of the types of plants that will thrive in the new border, and you’ll avoid frustrations later down the line when things may struggle to grow due to their conditions.
If you’re planting herbaceous perennials, bear in mind that they’ll really flourish next year, so consider planting a mix of perennials and annuals to help the border thrive while your perennials are establishing themselves.
Measure up
Another important factor in designing your new border is knowing how much space you’ve got to work with - there’s nothing worse than returning from the nursery with a car boot filled with blooms, only to discover you’ve bought far too many or few for your desired space. You’ll also want to know the size of the border so you can calculate how much mulch you’ll need once you’ve finished planting.
Dream in colour
Once you know the size and conditions of your new border, you can start planning which plants you’d like to fill it with. For small borders, one type of each plant will give you plenty to be working with, while for larger borders you may want to create clusters of 3-5 plants. Also plan for filling any gaps with bedding plants, seeds and bulbs.
Think about what’s in flower when, as timing will be essential when it comes to keeping the colour going for as long as possible.
Start digging
Once you’ve defined the space for your border, it’s time to start making that dream a reality. Firstly, use a spade to cut the desired shape for the border, then lift out the grass in sections. Remove any stones or roots that may be lying under there.
Once this is done, you can put down some compost to help enrich the soil and encourage healthy growth in your new plants.
Now it’s time to edge your border - use your spade to define a clear edge of about 4-6 inches deep. If you’re looking for really neat edges, use shears to trim the grass after digging out your edges.
Plant prep
Now that you’ve dug out your border and it’s ready for your plants, it can be tempting to just start putting things into the ground - but be patient because a little planning now will pay off later.
Before planting, take each of your plants in its pot and place it in the position you’d like it to grow in. Do this with each one until they’re all laid out, then stand back and take a look. Now’s the time to move anything you’re unsure about or that won’t give you the desired look you’re after.
Let it grow
It’s the moment you’ve been waiting for - planting time! Dig each hole to be about the same size as the pot, and place the plant into it, teasing the roots out as you go. Once everything is in place, water your new border thoroughly. Finally, add some mulch to keep the soil moist (and to deter those pesky weeds from ruining your hard work) - then stand back and admire your handiwork!